How to Measure a Shirt
Every measurement here is taken with the shirt laid flat, never on a body, and a flat width is half of the way round. Eight points, one diagram each, in the order the fit engine weights them.
Last verified: 31 August 2026
Lay the shirt flat on a hard surface, smooth the seams, stretch nothing, and read every number in inches with the tape held straight. That is the whole method. The rest is knowing where the eight points sit, which is what the diagrams below are for.
One idea does more work than any other on this page: a garment measurement is a width across a flat shirt, and a body measurement is a circumference around a person. A shirt measuring 20" from pit to pit is roughly 40" around inside. Halve a body number before you compare it to a size chart, or double a flat one — but never set them side by side untouched. Body measurement versus garment measurement takes that apart properly.
These eight definitions are the ones the ShirtMath app displays, the photo scanner is judged against, and the methodology page works from. Measure this way and your numbers are directly comparable to every garment in the catalog. They cover tops; trousers carry a separate set of eight.
Start here: the five steps people get wrong
Body length is the measurement most often taken wrong, and the setup is why. Almost every bad number on a shirt comes from one of these five steps, not from the tape work itself.
- Use a hard surface. A table, a counter, or bare floor. A duvet or a carpet flexes under the tape and quietly widens every reading.
- Lay it front up and close it. Buttons and zips fastened, so the front cannot spread.
- Smooth, do not stretch. Flatten the ripples outward from the centre with your palm until the side seams lie straight. Knit gives with almost no force, and a casual tug changes the number.
- Start body length at the high point of the shoulder — where the shoulder seam meets the collar — not at the top of the collar band. Starting on the band silently adds its height to every length you record.
- Keep the tape straight. Follow the shortest line between the two points, not the contour of the cloth, and read at the seam rather than near it.
The eight points of measure for tops
Each definition below is quoted verbatim from the point-of-measure table inside ShirtMath. If the guide, the app and the scanner disagreed about what “chest” means, no comparison anywhere on the site would hold.

Chest (pit to pit)
The definition: “Lay flat, measure straight across 1" below the armholes, seam to seam.”
Where the tape goes. Find the two points where the sleeve seams meet the side seams — the pits. Come down one inch from each, then run the tape straight across, edge to edge, crossing the side seams at a right angle. Start at the left seam edge, stop at the right seam edge.
The common mistake. Measuring level with the armhole itself, where seam bulk and the folded sleeve distort the width. An inch below, the body lies flat and the number repeats. This is the single most published number in size charts and the heaviest input in ShirtMath’s fit scoring, so it is worth taking twice. Pit to pit measurement goes deeper.

Body length
The definition: “From the highest point of the shoulder seam straight down to the bottom hem.”
Where the tape goes. Anchor at the high point of shoulder, written HPS — the place the shoulder seam runs into the collar. Drop the tape dead straight to the bottom edge of the hem. It does not follow the curve of the chest, and it does not stop at the top of the hem band.
The common mistake. Starting at the collar’s top edge, which adds the collar height to every shirt you own and makes them all read long. If the hem is curved, measure at the front and note that you did. Length is the second-heaviest input in the fit score, after chest.
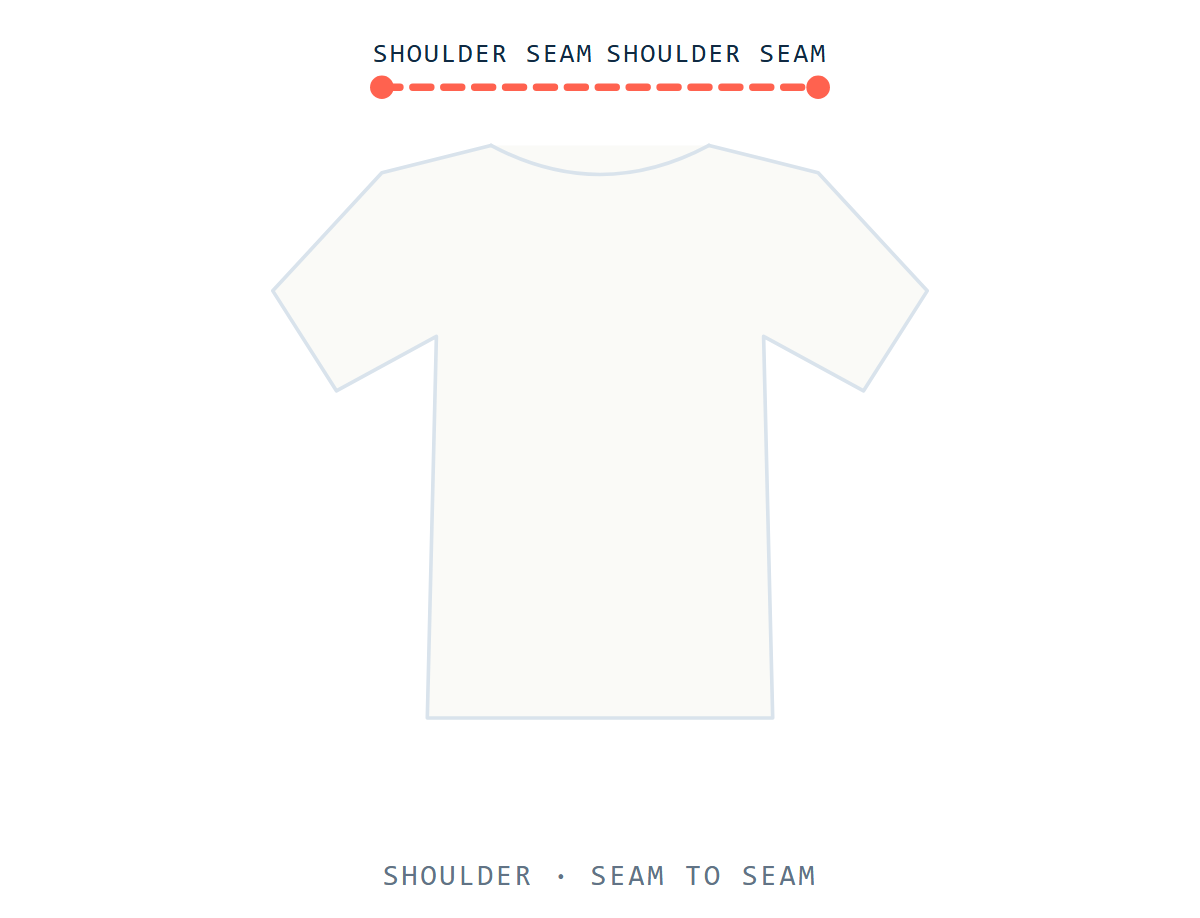
Shoulder width
You have probably arrived here wanting to measure your own shoulders. Quickly, then: stand relaxed, have someone run a tape across your back from the bony point of one shoulder to the other. That number is real, but it is not what picks a shirt.
The garment number is, and it is the one below. A shirt’s shoulder seam can sit inboard of your shoulder point, on it, or well past it, and the same body measures well in all three — that gap is the cut, and no body measurement recovers it. Body versus garment measurement explains why the garment wins.
The definition: “Across the back, from the top of one shoulder seam to the other.”
Where the tape goes. Flip the shirt face down. Measure across the back from the point where one shoulder seam meets the sleeve to the same point opposite.
The common mistake. Measuring across the front, where the collar sits lower and the tape drifts off the seam points. On a raglan sleeve this point does not exist at all — leave it blank rather than inventing an endpoint.

Sleeve length
The definition: “From the shoulder seam down the outside of the sleeve to the cuff edge.”
Where the tape goes. Start where the shoulder seam meets the sleeve, follow the outer fold, and stop at the far edge of the cuff or sleeve hem.
The common mistake. Assuming every brand means that. They do not, and the disagreement is large enough to change what you buy — some measure from the centre of the back of the neck instead, which produces a number roughly twice as big for the same shirt. Because this one point needs its own page, it has one: how to measure sleeve length sets out both conventions and which brands use which.

Bicep
Most people looking this up want to measure their arm: flex or relax as you prefer, wrap the tape around the fullest part, keep it level, read the circumference. That is your bicep.
The shirt’s bicep is a different quantity and it is the one that predicts whether the sleeve binds. It is a flat width across the sleeve, so it is roughly half your arm circumference plus whatever ease the pattern maker left. Compare like with like or the sleeve will surprise you — see body versus garment measurement.
The definition: “Across the sleeve, 1" below the armhole, laid flat.”
Where the tape goes. With the sleeve unfolded and lying in one plane, measure across it one inch below where it joins the body, from the outer fold to the underarm seam.
The common mistake. Measuring mid-sleeve, where the taper has already narrowed it, or over a creased sleeve. The scanner names bicep one of its two least reliable readings, so re-tape a scanned bicep that looks odd.

Sleeve opening (cuff)
The definition: “Straight across the cuff opening, laid flat.”
Where the tape goes. The width of the sleeve’s exit — the cuff of a long sleeve, the hem of a short one. Arrange the opening flat in one plane and measure edge to edge across it.
The common mistake. Measuring around the opening, which doubles the number, or pulling a ribbed cuff taut. Let the rib rest at its natural width. This is the scanner’s other least reliable reading, so check it by hand as well. It carries the smallest weight in the fit score, which makes it the one to leave blank if you are only taking a few.

Waist and hem width (sweep)
On a straight-cut tee these are the same measurement, and ShirtMath records it once, as sweep. The shirt has no separate waist to find: the side seams run essentially straight, so the narrowest point and the bottom opening are the same line.
On a tapered shirt they part company. There the waist is the narrowest point of the body, usually a few inches above the hem, and the sweep is still the opening at the very bottom. If you are measuring a fitted dress shirt, take both and label them; if you are measuring a tee, take the one and do not invent the other.
The definition: “Straight across the bottom opening, laid flat.”
Where the tape goes. Across the very bottom of the shirt, edge to edge at the hem.
The common mistake. Measuring an inch or two above the hem, where a tapered side seam has already pulled in. Measure the opening itself. Read against the chest, the sweep tells you the body shape: a sweep close to the chest is a near-straight tube, a sweep well under it is a taper.

Neck and collar
If you came here for your collar size — the 16 in a dress-shirt size like 16 34/35 — that is a body measurement: the circumference around your neck, taken with one finger of slack. It is a different system, and the dress shirt size chart speaks it.
What ShirtMath records is the garment’s neck opening, a flat width. It is not a collar size and the two numbers will never match; comparing them is the classic version of the mistake body versus garment measurement is about.
The definition: “Across the inside of the collar, seam to seam.”
Where the tape goes. Straight across the inside of the collar, from one seam edge to the other where the collar joins the body.
The common mistake. Taping the collar’s outside edge, which adds the band width at both ends.
Why a flat width is not a body measurement
Everything above measures cloth. Your chest is a circumference taken around you; a shirt’s chest is a width taken across it while it lies flat. The bridge between them is doubling, and the thing the bridge does not carry is ease — the gap between your circumference and the garment’s. Whether a 20" flat shirt fits a 38" body loosely, a 40" body closely, or a 42" body not at all is entirely a question of how much ease you want. There is no correct amount, and which amount you prefer is exactly the information a letter size throws away.
The letter fails to pin down the garment either. Here is size M, in published flat chest widths, across the eight blank styles ShirtMath holds specifications for:
| Style | Cut | Chest, size M (in, flat) |
|---|---|---|
| Bella+Canvas 3001C | unisex | 20.0 |
| Champion T525C | unisex | 20.0 |
| Gildan 5400 | unisex | 20.0 |
| Gildan G500 | unisex | 20.0 |
| Hanes 5250T | unisex | 20.0 |
| Comfort Colors C4017 | unisex | 20.5 |
| Next Level 3600 | unisex | 20.5 |
| Gildan G500L | ladies | 17.5 |
Seven unisex cuts land within half an inch of one another, 20.0–20.5". Then the ladies’ cut of the same Gildan shirt measures 17.5" — a 3" spread inside a single letter, which is 6" of circumference. The width is a fact; the letter is a decision, and vanity sizing is the story of how those decisions drifted apart. What your shirt size means decodes the sizing languages sharing one rack.
Recording your numbers
The best-fitting shirt you own is a better size chart than any brand publishes, because it already encodes your preferences — your ease, your length, your sleeve — in eight numbers. Measure it once and write them down. A published spec row, next to the blanks to fill in:
| Point of measure | Bella+Canvas 3001C, size M (published spec) | Your best shirt |
|---|---|---|
| Chest, pit to pit | 20.0 | |
| Body length, HPS to hem | 29.0 | |
| Shoulder, seam to seam | 17.74 | |
| Sleeve length | 8.5 | |
| Bicep | 7.32 | |
| Sleeve opening | 6.44 | |
| Hem width (sweep) | 19.51 | |
| Neck opening | 6.9 |
Once those numbers exist they do work. The shirt size calculator turns a pit to pit into a letter size in each published run, and the pit to pit chart shows where any chest width falls. If you buy printing blanks, the blank tee comparison puts all eight specced styles side by side. The rest of the measuring and fit guides build on these same definitions.
Common questions
How do you measure the length of a shirt?
Where is sleeve length measured from?
How do you measure the waist on a shirt?
What does chest width mean?
Do you measure a shirt front only or all the way around?
How accurate is a brand spec sheet?
Keep going
Or photograph it and let ShirtMath do it. The scanner reads one photo of a shirt laid flat and returns one number per measurement, in inches and cm — anything it cannot read confidently is left blank rather than guessed. About half of readings land within an inch of a real tape, so treat them as a guide and check anything that matters.
Scan a shirt